Note
Go to the end to download the full example code.
Add a new example#
Summary: This example demonstrates how to add new examples and serves as a template that you can use in their creation.
A block comment must be included at the top of any new example. Each example must have a reference tag in this format:
.. _ref_my_example:
The .. _ref_ is necessary. Everything that follows is your reference tag.
Keep all references in snake case.
This section should give a brief overview of what the example is about and/or demonstrates. The title should be changed to reflect the topic your example covers.
New examples should be added as Python scripts to:
pyprimemesh/examples/gallery
Note
Avoid creating new folders unless absolutely necessary. If in doubt, put the example
in the folder closest to what it is doing and its precise location can be advised
on in the pull request. If you must create a new folder, make sure to add a
README.txt file containing a reference, a title, and a single sentence describing the folder.
Otherwise, the new folder is ignored by Sphinx.
Example file names should be in the format:
example_name.py
Note
Supporting input files for the example, such as CAD or mesh file assets, must be either original content or have appropriate licensing and ownership permissions from their respective owners. If the input files are used within the example script provided they must be capable of running in the CI pipeline. This means that only files that can be read using the native file formats and CAD readers can be used in the scripted examples.
The recommended data formats to be included in the example are:
.pmdat
.fmd
.scdoc or .dsco (supported on Windows OS)
Supporting input files should be added in:
Github Example Data Repository
Referencing files as enum and creating download function in:
pyprimemesh/examples.py
Also adding download function to:
pyprimemesh/examples/__init__.py
After this preamble is the first code block:
import ansys.meshing.prime as prime
from ansys.meshing.prime.graphics import PrimePlotter
# Start Ansys Prime Server instance and get client model
prime_client = prime.launch_prime()
model = prime_client.model
# Your code goes here...
mesh_util = prime.lucid.Mesh(model=model)
# For Windows OS users scdoc is also available:
# mixing_elbow = prime.examples.download_elbow_scdoc()
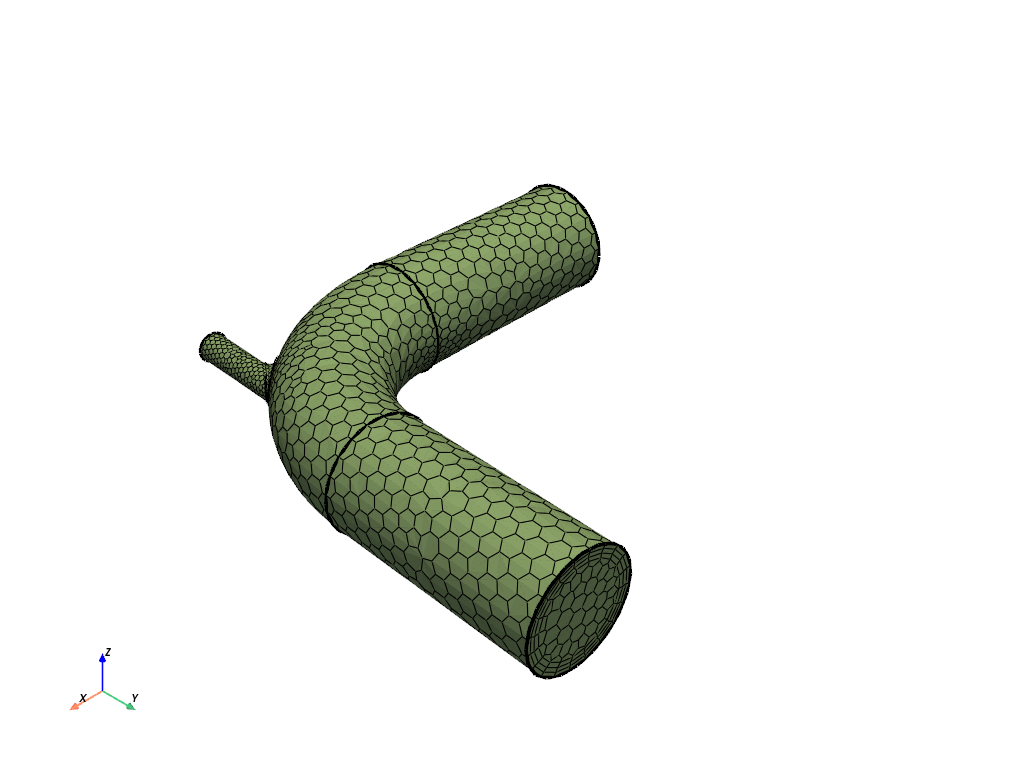
mixing_elbow = prime.examples.download_elbow_fmd()
mesh_util.read(mixing_elbow)
print(model)
Warning (Client): Modification of these configurations is not recommended.
Refer the documentation for your installed product for additional information.
/home/runner/work/pyprimemesh/pyprimemesh/.venv/lib/python3.14/site-packages/ansys/meshing/prime/internals/cyberchannel.py:183: UserWarning: Starting gRPC client without TLS on 127.0.0.1:59223. This is INSECURE. Consider using a secure connection.
  warn(
Part Summary:

Part Name: flow_volume
Part ID: 2
    13 Topo Edges
    9 Topo Faces
    1 Topo Volumes

    0 Edge Zones
        Edge Zone Name(s) : []
    0 Face Zones
        Face Zone Name(s) : []
    1 Volume Zones
        Volume Zone Name(s) : [volume]

    2 Label(s)
        Names: [inlet, outlet]

    Bounding box (-203.2 -228.6 -50.8)
                 (203.169 203.2 50.8)
Create sections#
You can break up code blocks in titled sections that provide descriptive text. When Sphinx is used to generate the documentation, this content is interpreted as ReStructured Text (RST).
Note
You only need to create the Python (PY) files for the example. The
sphinx-gallery extension automatically generates the Jupyter
notebook, the HTML files for the documentation, and the demo script.
Sections can contain any information that you may have regarding the example, such as step-by-step comments and information on motivations. In the generated Jupyter notebook, this text is translated into a markdown cell.
As in Jupyter notebooks, if code is left unassigned at the end of a code block
(as with model in the previous block), the output is generated and
printed to the screen according to its __repr__. Otherwise, you can use
print() to output the __str__.
# more code...
mesh_util.surface_mesh(min_size=5, max_size=20)
mesh_util.volume_mesh(
    volume_fill_type=prime.VolumeFillType.POLY,
    prism_surface_expression="* !inlet !outlet",
    prism_layers=3,
)
Render graphics#
If you display graphics, the result is auto-generated and rendered on the page:
display = PrimePlotter()
display.plot(model)
display.show()
Make a pull request#
Once your example is complete and you’ve verified builds locally, you can make a pull request (PR). Branches containing examples should be prefixed with doc/ as per the branch-naming conventions found in the Contribute topic in the PyAnsys Developer’s Guide.
Stop Ansys Prime Server#
prime_client.exit()
Total running time of the script: (0 minutes 13.162 seconds)